If you’re looking for a new challenge in sourdough baking, doughnuts are a great option. You’ll need an active sourdough starter for this recipe so be sure you’ve fed your starter well before you begin.
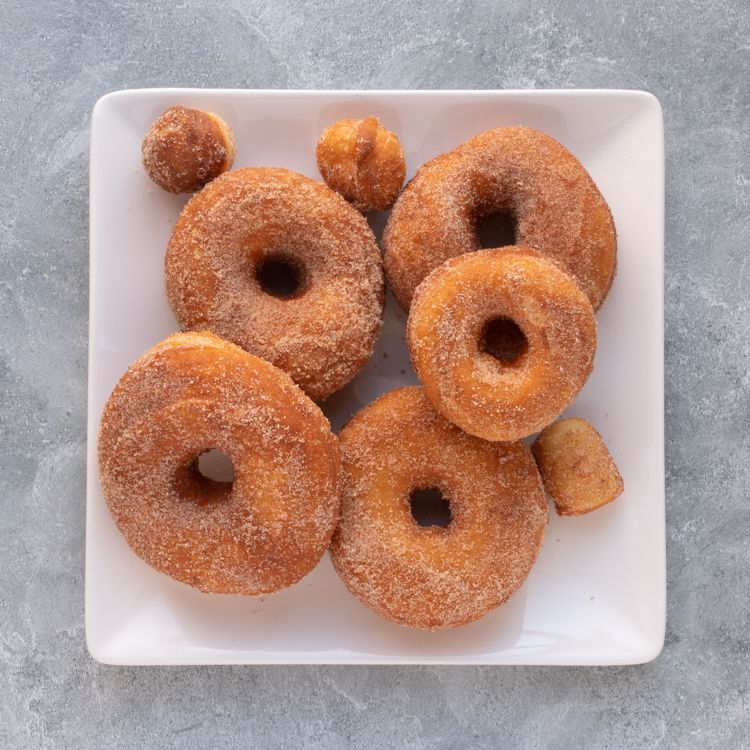
This is also a customizable recipe where time is concerned. You can do it all in one day, or you can store your dough in the fridge before or after you roll it out. Remember putting the dough in the fridge at any stage slows the fermentation process, but it also intensifies the sour flavor. You can manipulate this recipe to fit your needs where time and flavor are concerned. You can glaze these doughnuts with a simple mixture of powdered sugar, melted butter, and vanilla extract or you can roll them in cinnamon sugar fresh from the frying pan.
In this recipe, you’ll see the term autolyse. This is just a word for the gentle mixing of flour and water followed by a resting time. This allows the two ingredients to become one and yields a much better result.
“The sourdough donuts were excellent. Though time-consuming, the recipe was not difficult and the stand mixer does most of the work. After the cut-out donuts had proofed, they were very soft, so I stuck the pan in the freezer for about 10 to 15 minutes to firm them up before frying. That worked perfectly.” —Diana Rattray
A Note From Our Recipe Tester
Ingredients
-
1 cup water plus 2 tablespoons, room temperature, divided
-
2 cups unbleached all-purpose flour, divided, plus more for dusting
-
2 cups bread flour, divided, plus more for dusting
-
200 grams active sourdough starter
-
1/4 cup whole milk
-
1/4 cup (4 tablespoons) unsalted butter, room temperature
-
1/4 cup granulated sugar, fine white baker's sugar is best
-
3 large eggs
-
1 teaspoon salt
-
Canola or vegetable oil, for frying
-
Glaze of your choice or cinnamon sugar
Steps to Make It
-
Gather the ingredients.

The Spruce Eats / Julia Hartbeck
-
In a large bowl, mix 1 cup of water, 1 cup all-purpose flour, 1 cup bread flour, and the active starter until well incorporated. The mixture will be dry and you may need to remove it from the bowl and use your hands to mix. Scrape the sides of the bowl and form a dough ball. Cover and allow to autolyse (rest) for 1 hour.
The Spruce Eats / Julia Hartbeck
-
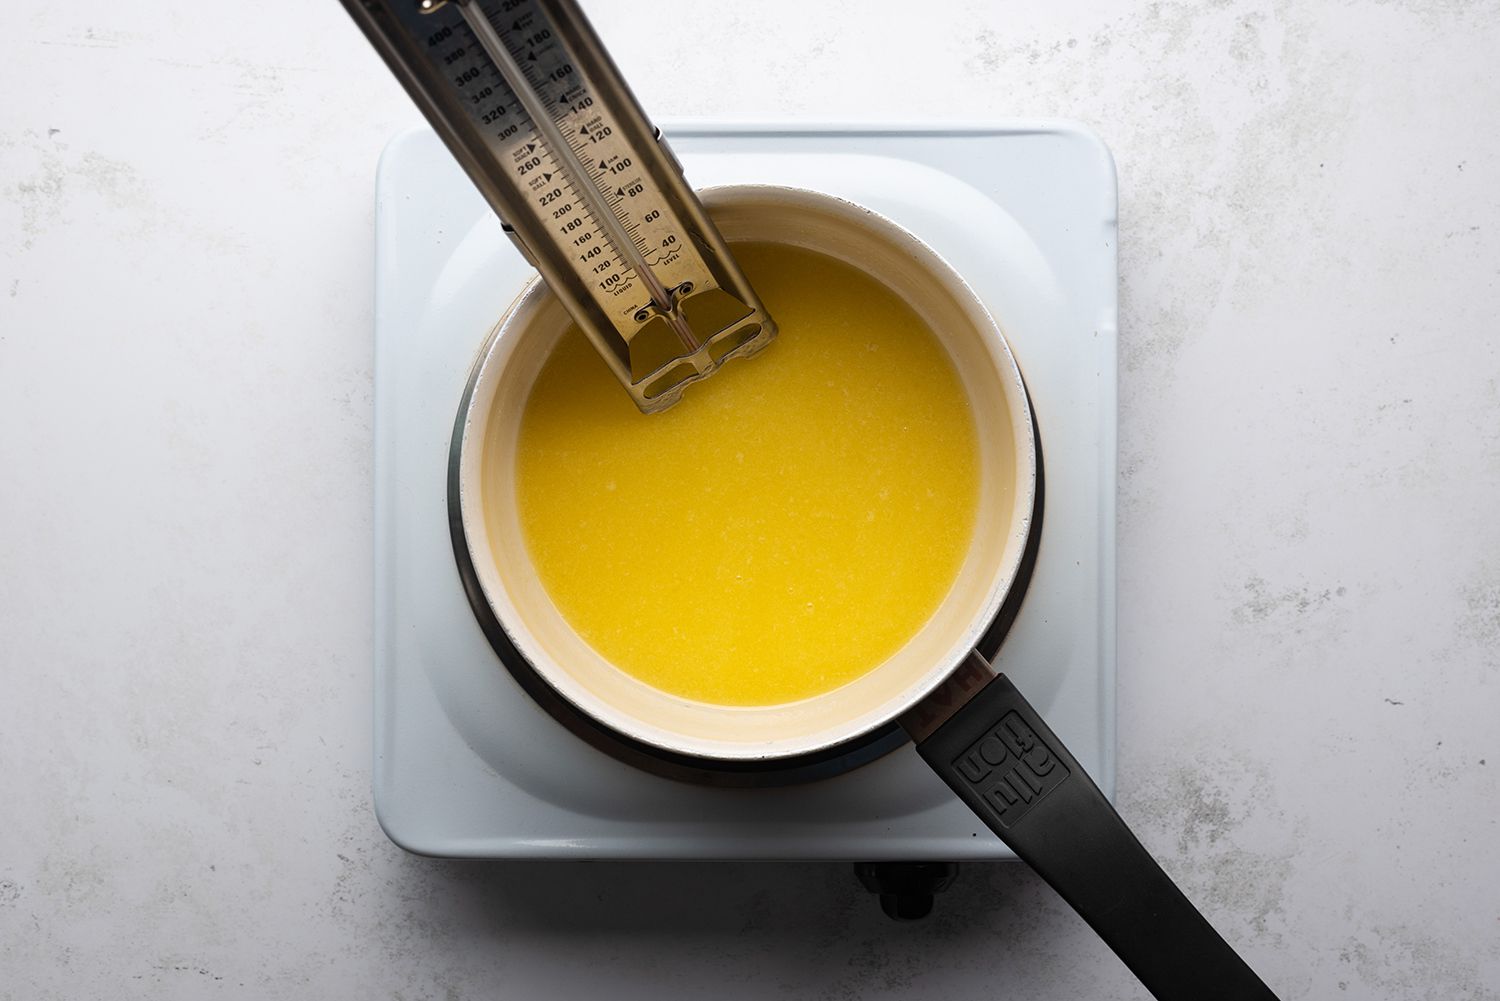
Heat the milk, butter, and sugar in a small saucepan over medium heat just until the butter is melted and the sugar is dissolved. Allow the mixture to cool to 85 F.
The Spruce Eats / Julia Hartbeck
-
Transfer the dough ball to the bowl of a stand mixer fitted with the dough hook.
The Spruce Eats / Julia Hartbeck
-
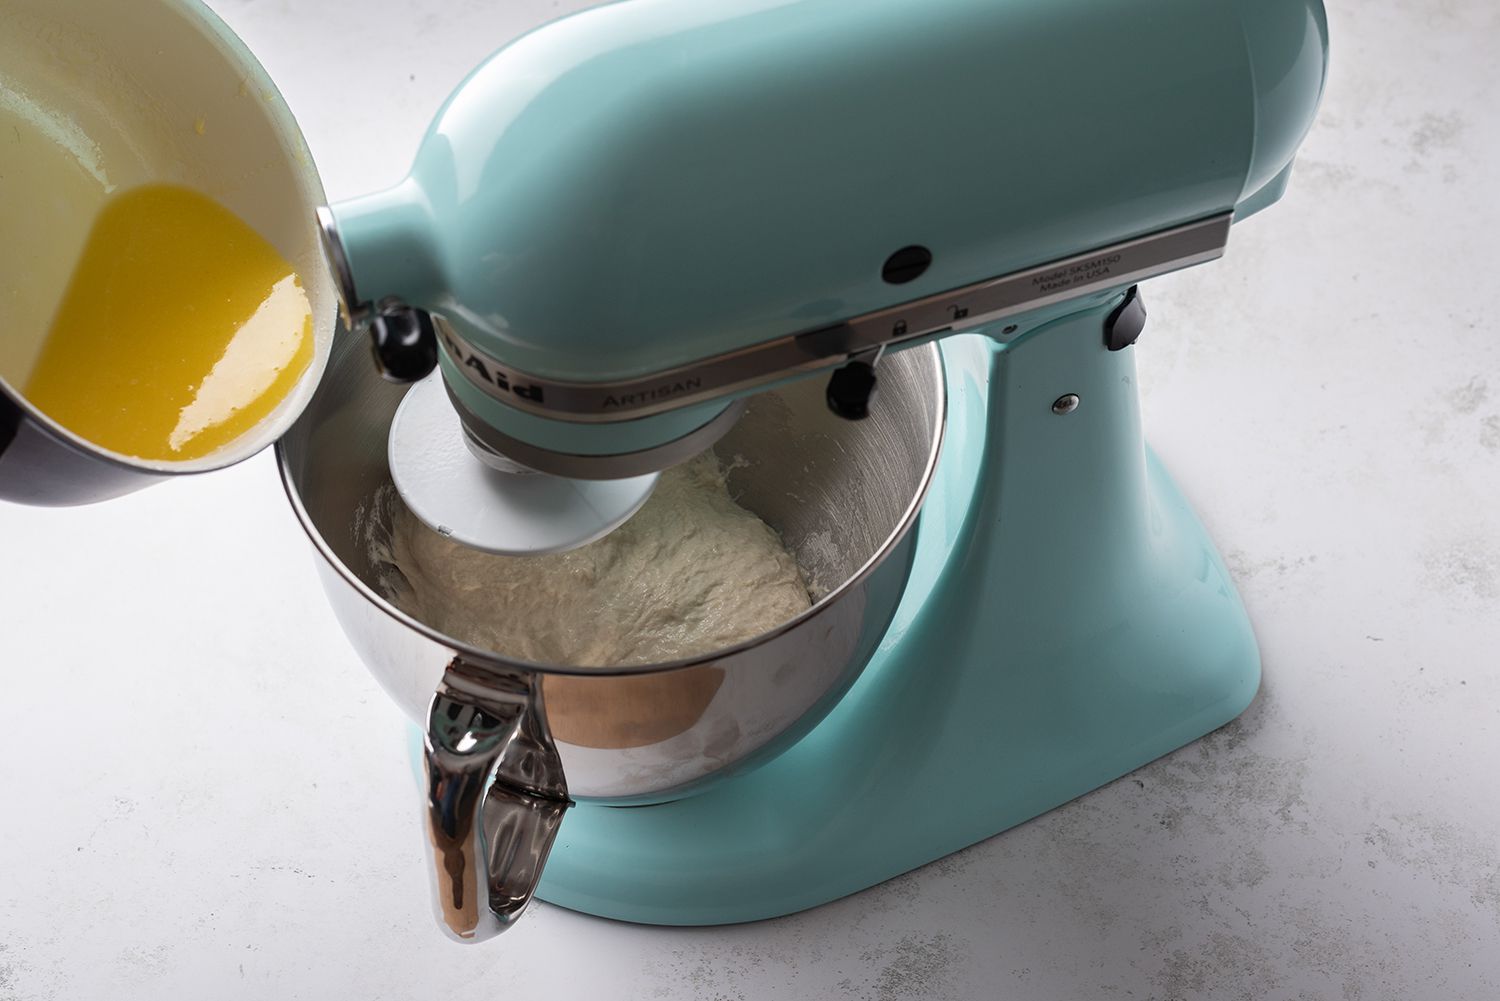
With the mixer running on low, slowly add the milk mixture to the flour mixture.
The Spruce Eats / Julia Hartbeck
-
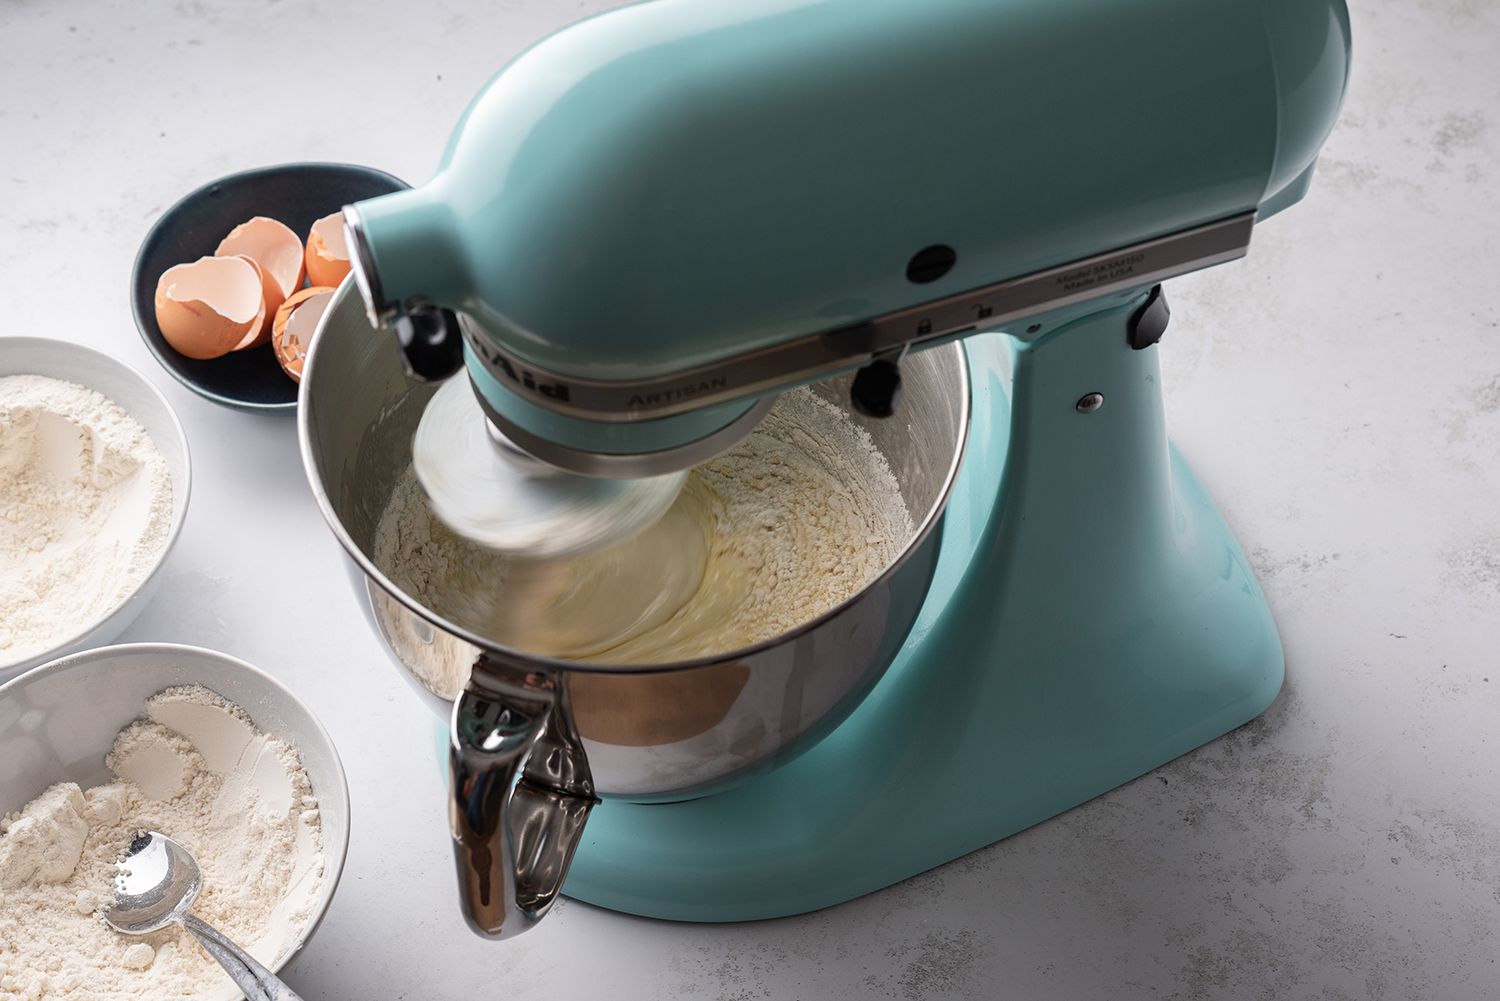
Add the eggs one at a time. Slowly add the remaining 1 cup all-purpose flour and 1 cup bread flour.
The Spruce Eats / Julia Hartbeck
-
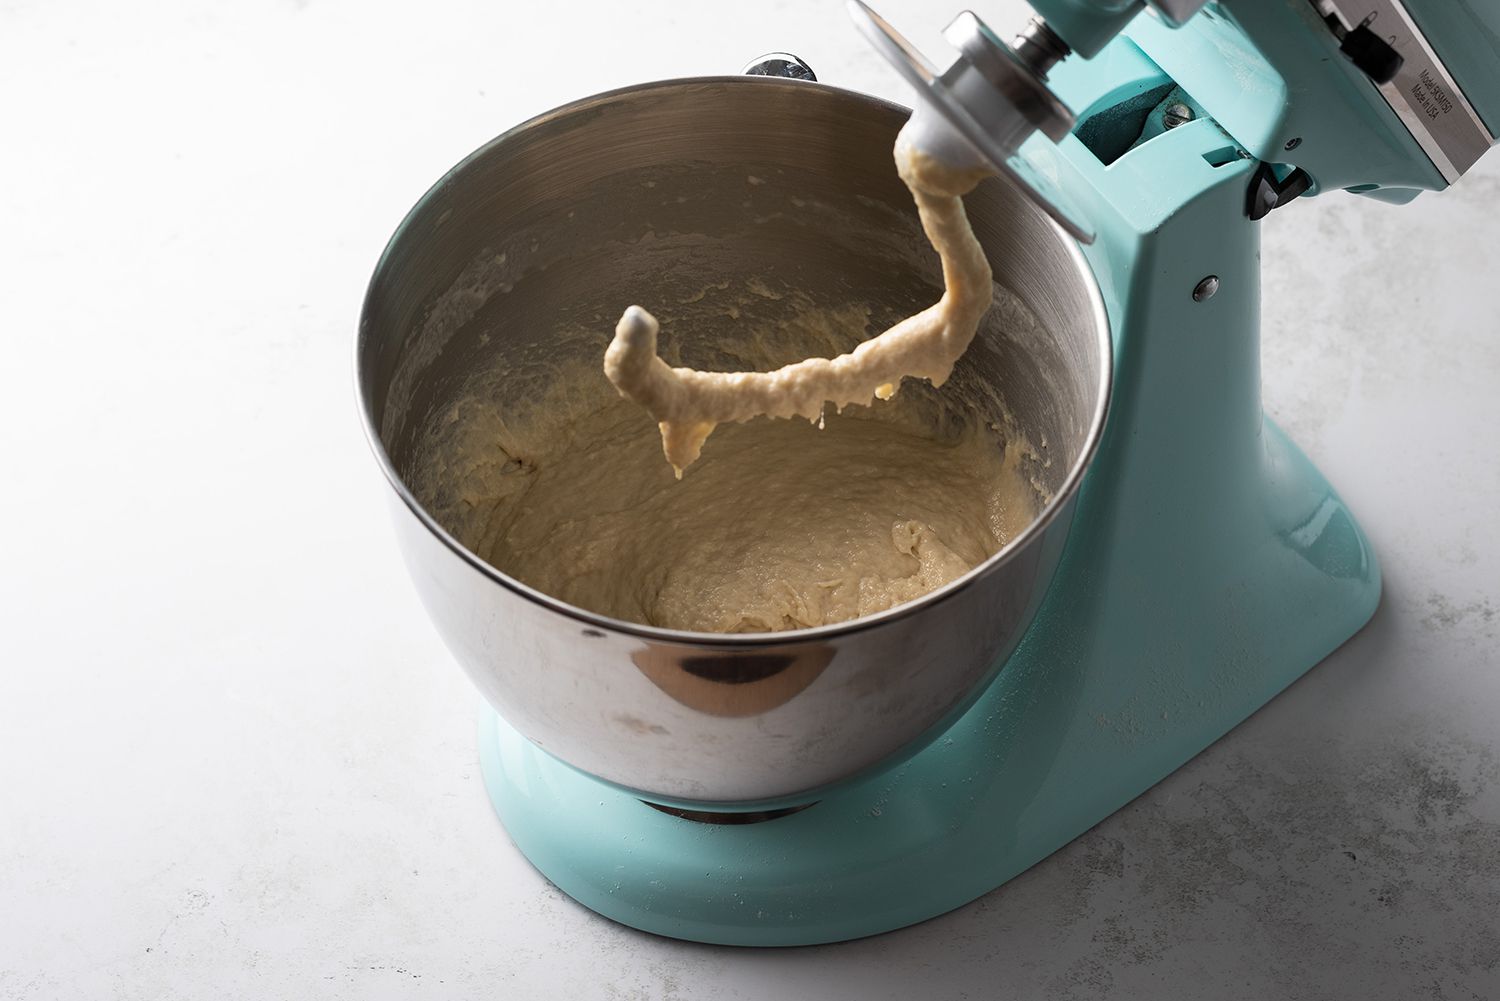
Once incorporated, raise the speed to medium-high and knead until the dough comes together fully, about 8 minutes. Scrape the excess dough from the dough hook and knead on a clean surface until the dough is only slightly sticky. You may need to add more flour, 1 to 2 tablespoons at a time.
The Spruce Eats / Julia Hartbeck
-
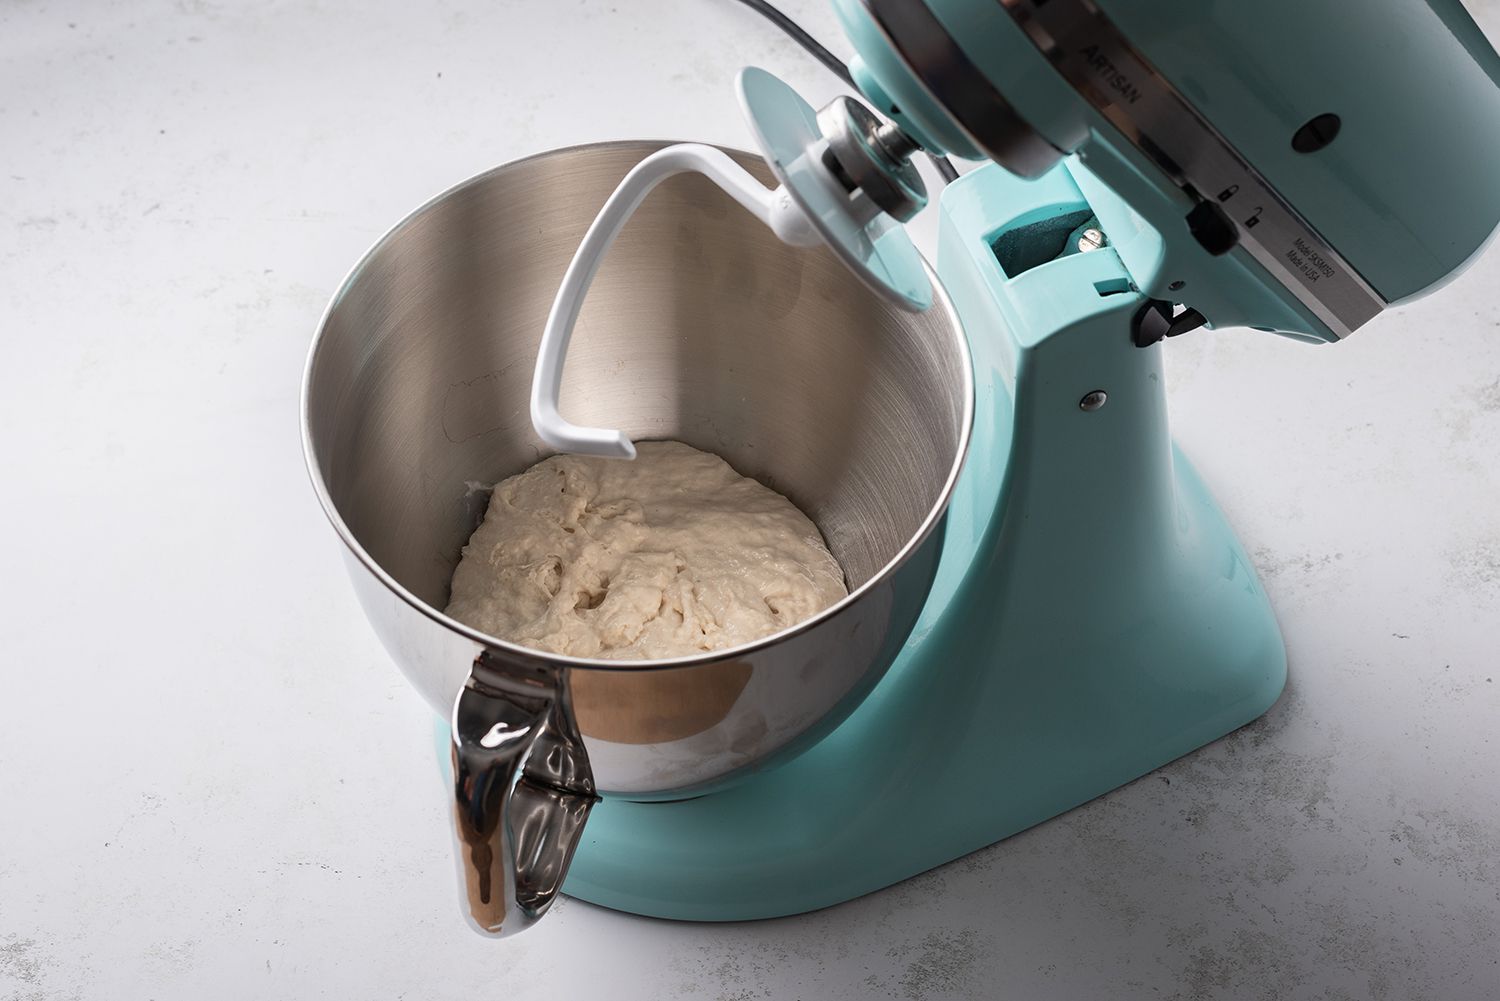
Once the dough is only slightly sticky and smooth, transfer to a clean and greased bowl and allow the dough to rest, covered for 30 minutes.
The Spruce Eats / Julia Hartbeck
-
Add the salt and remaining 2 tablespoons of water, then mix on medium speed with the dough hook for about 10 minutes, or until the dough is soft.
The Spruce Eats / Julia Hartbeck
-
Turn the dough out onto a clean, lightly floured surface and continue to knead, adding more flour when necessary, until the dough is smooth.
The Spruce Eats / Julia Hartbeck
-
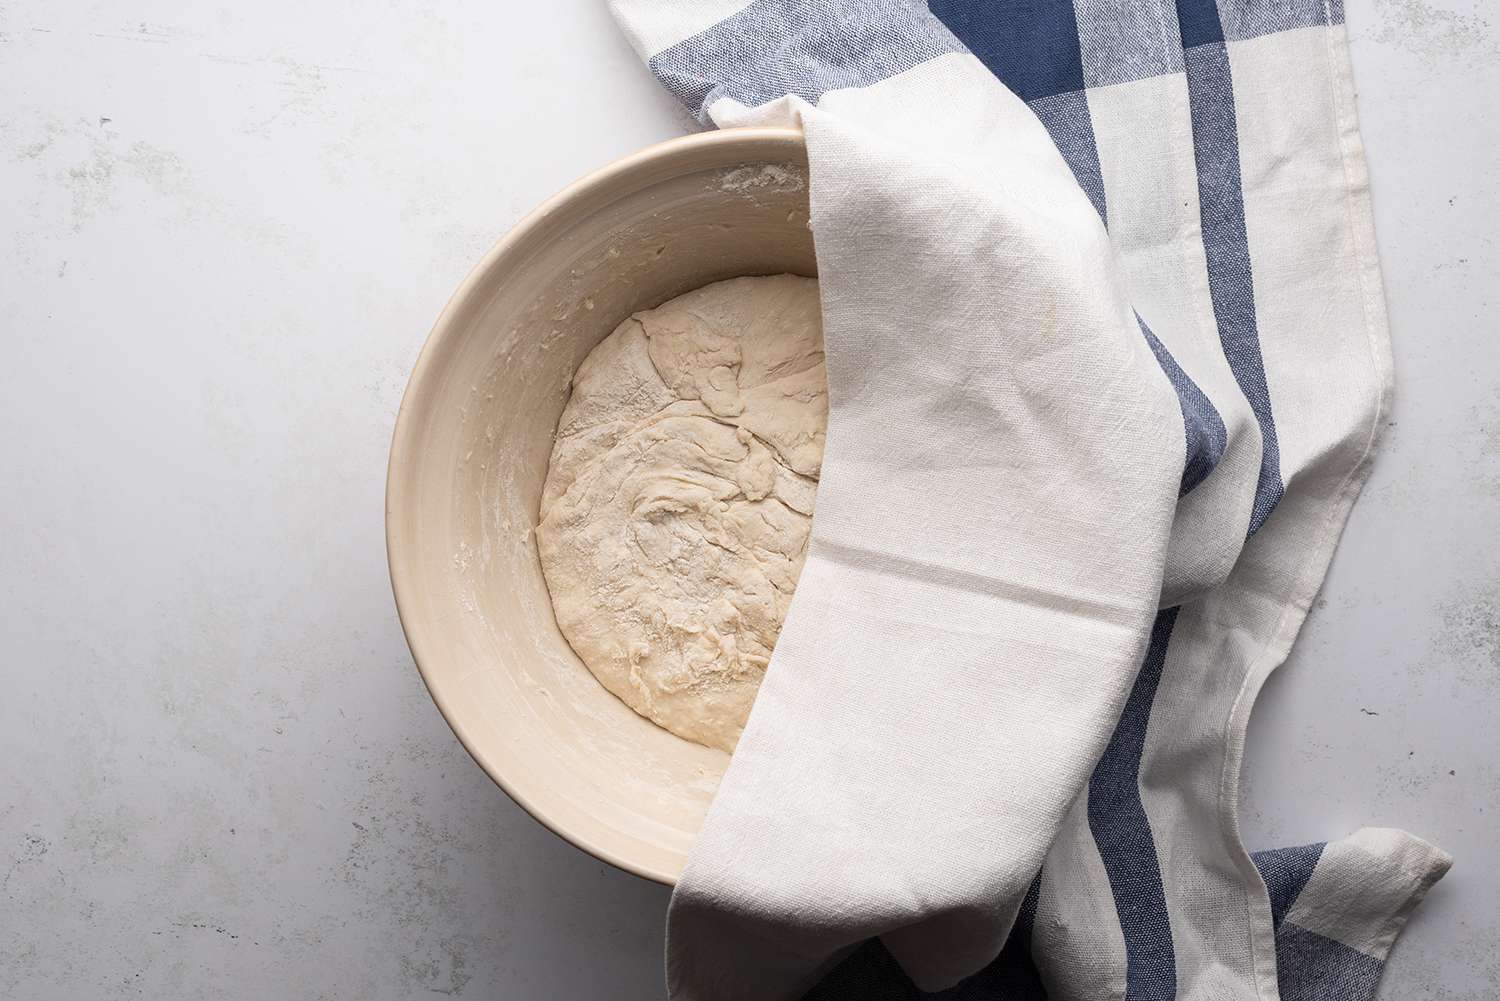
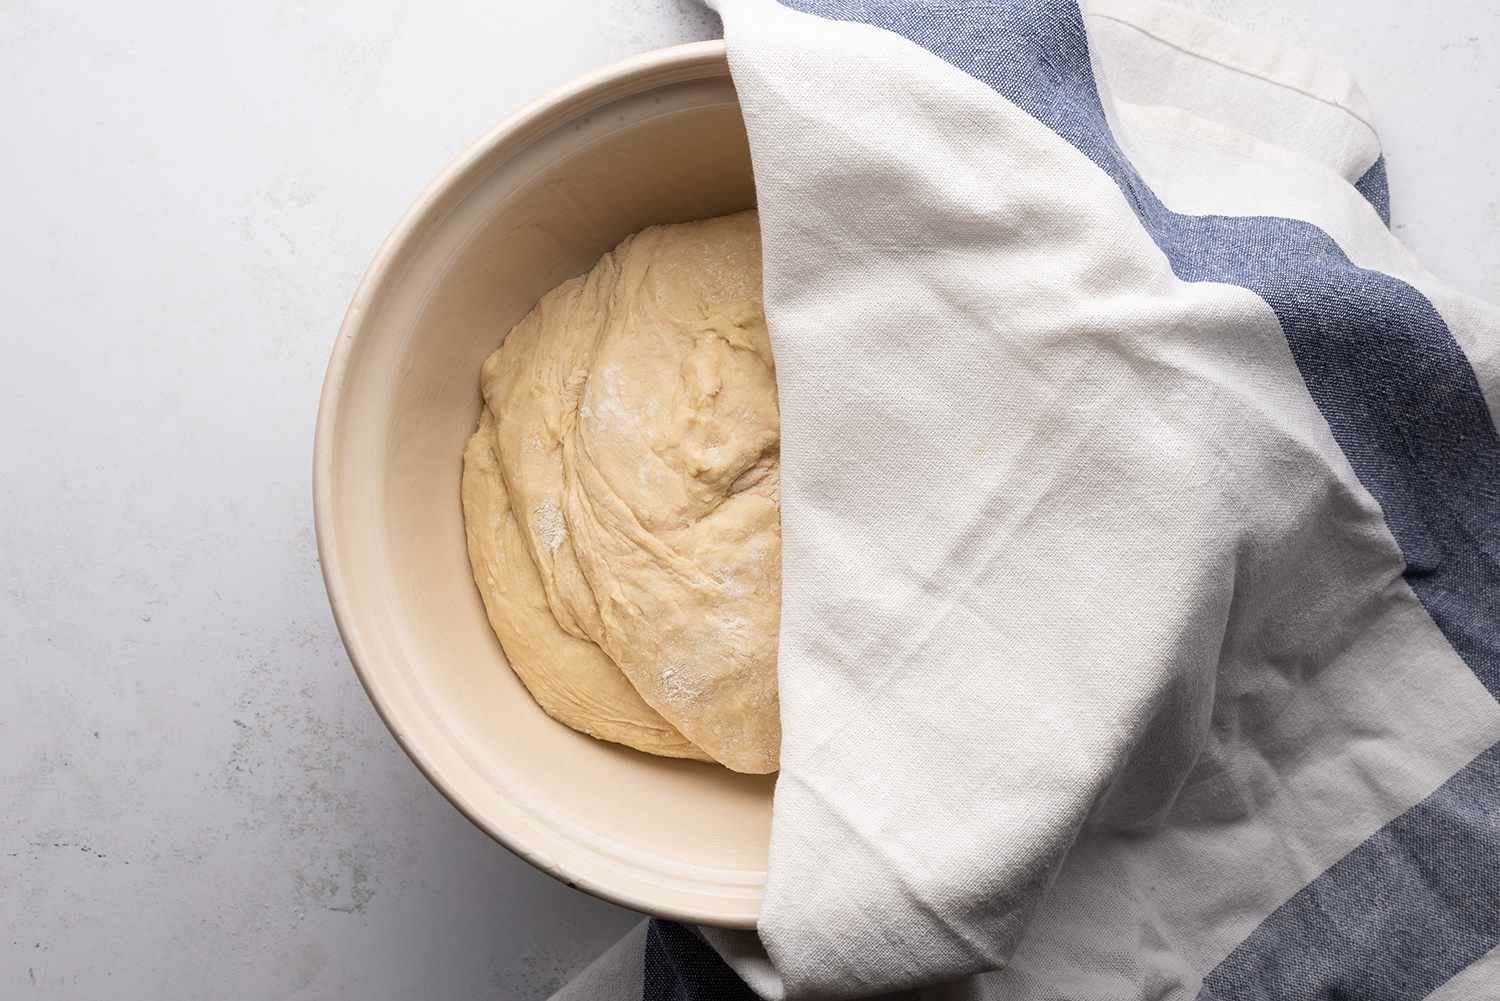
Form into a ball and let it rest in a greased bowl, covered, for about 5 hours. The dough should increase in size dramatically, about double. At this point, you can continue to the next step or cover the dough with plastic wrap and a kitchen towel and place in the fridge overnight.
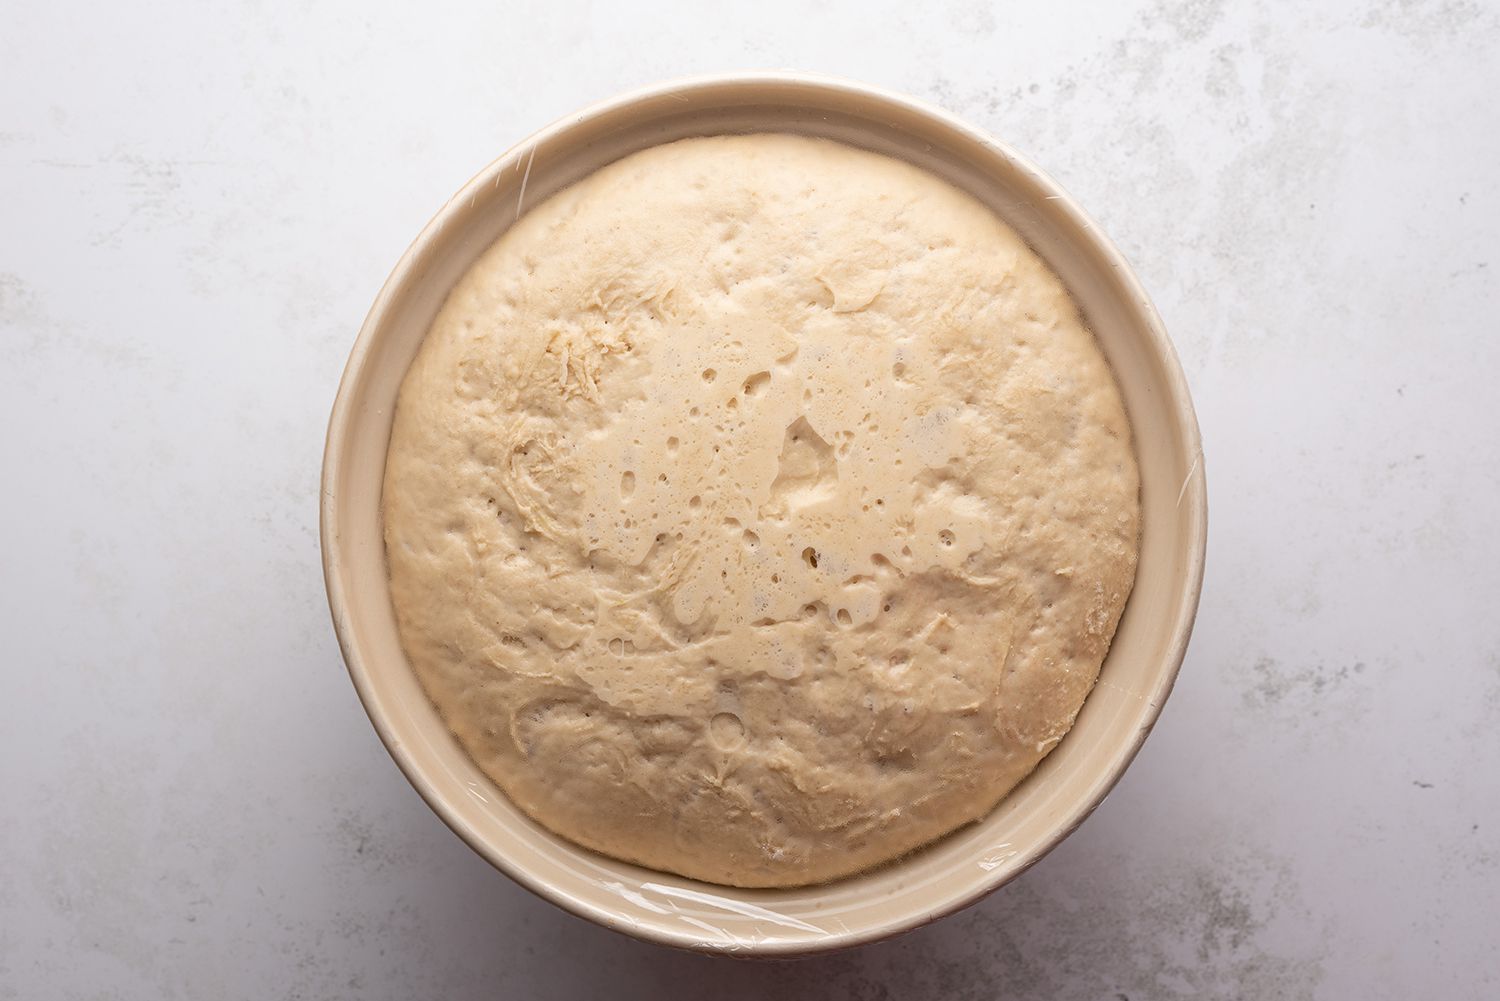
The Spruce Eats / Julia Hartbeck
-
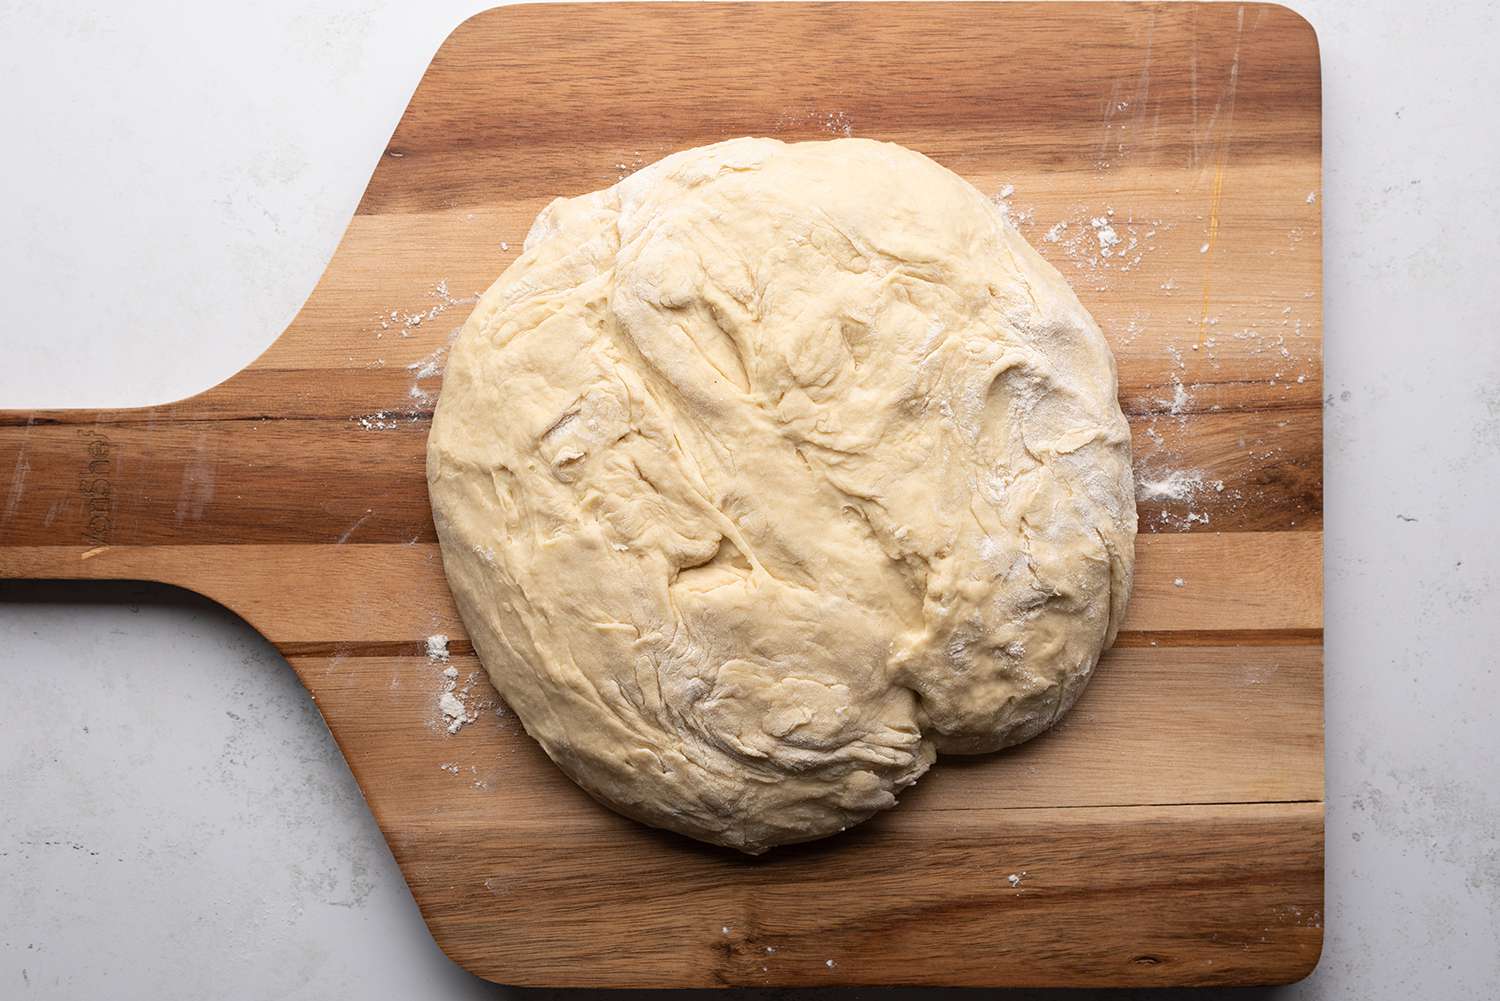
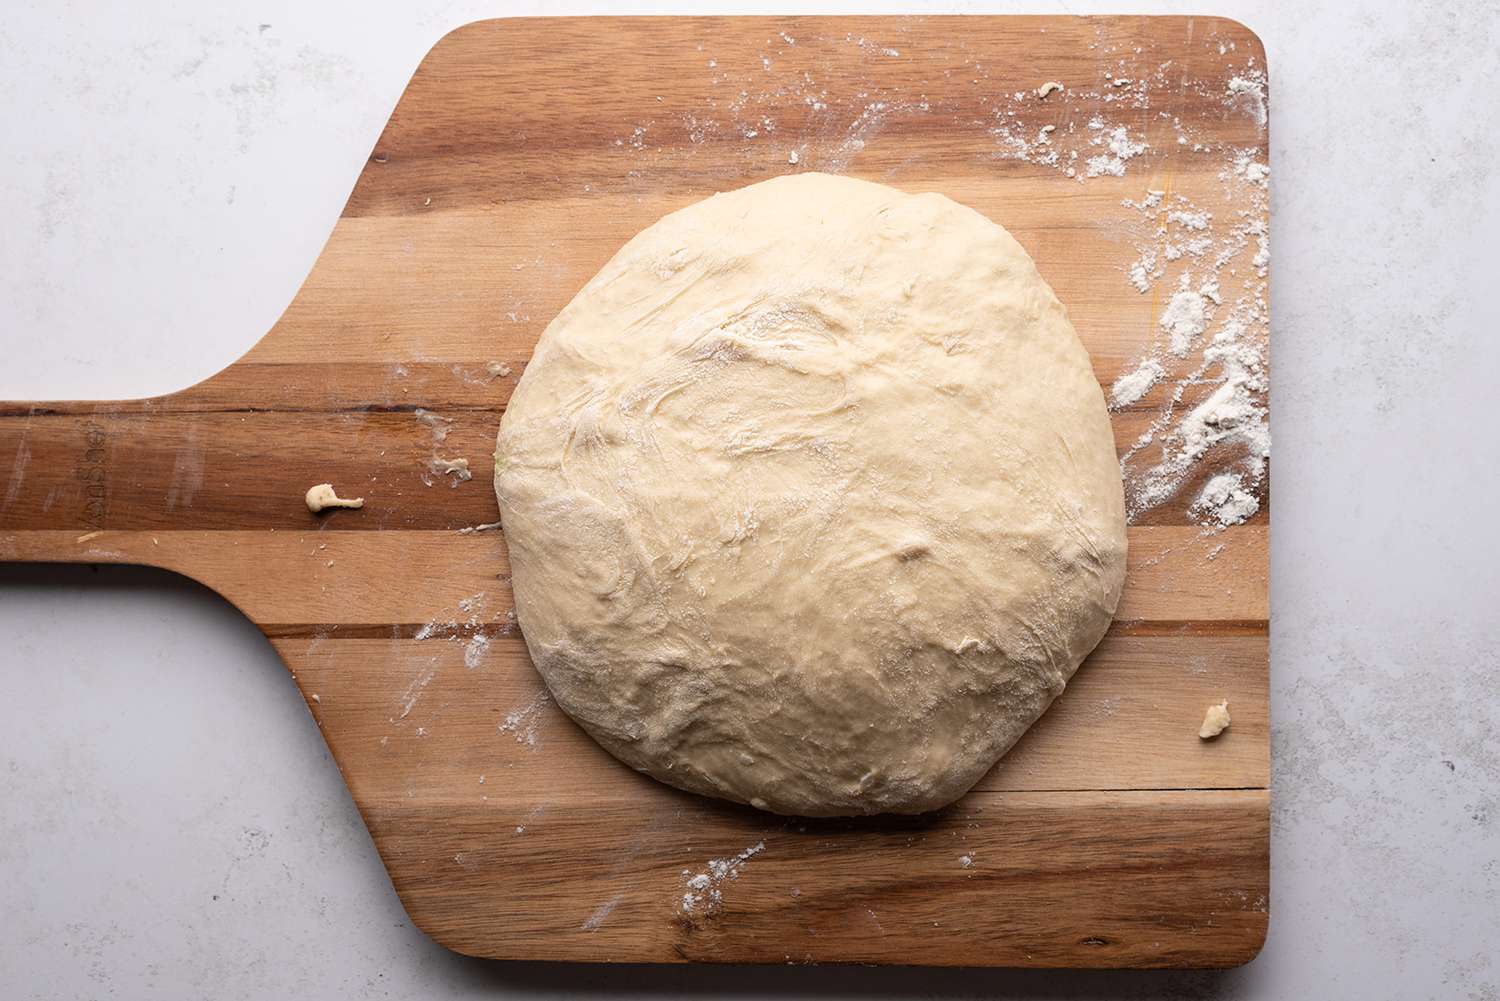
Turn the dough out onto a lightly floured surface and roll out to about 1/2 inch thickness.
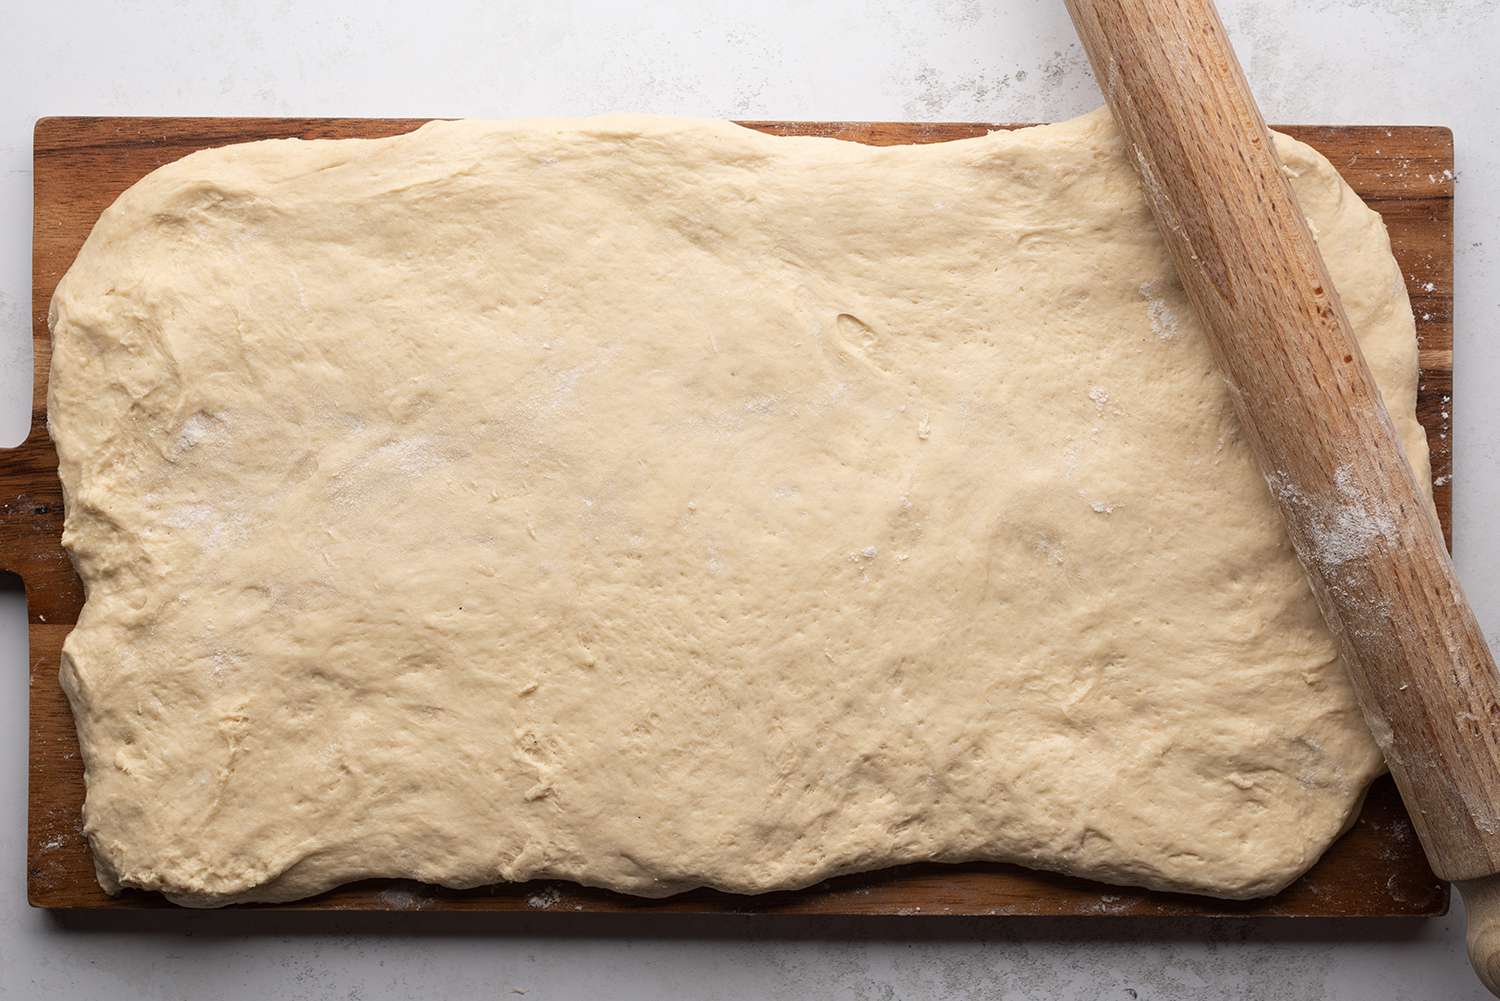
The Spruce Eats / Julia Hartbeck
-
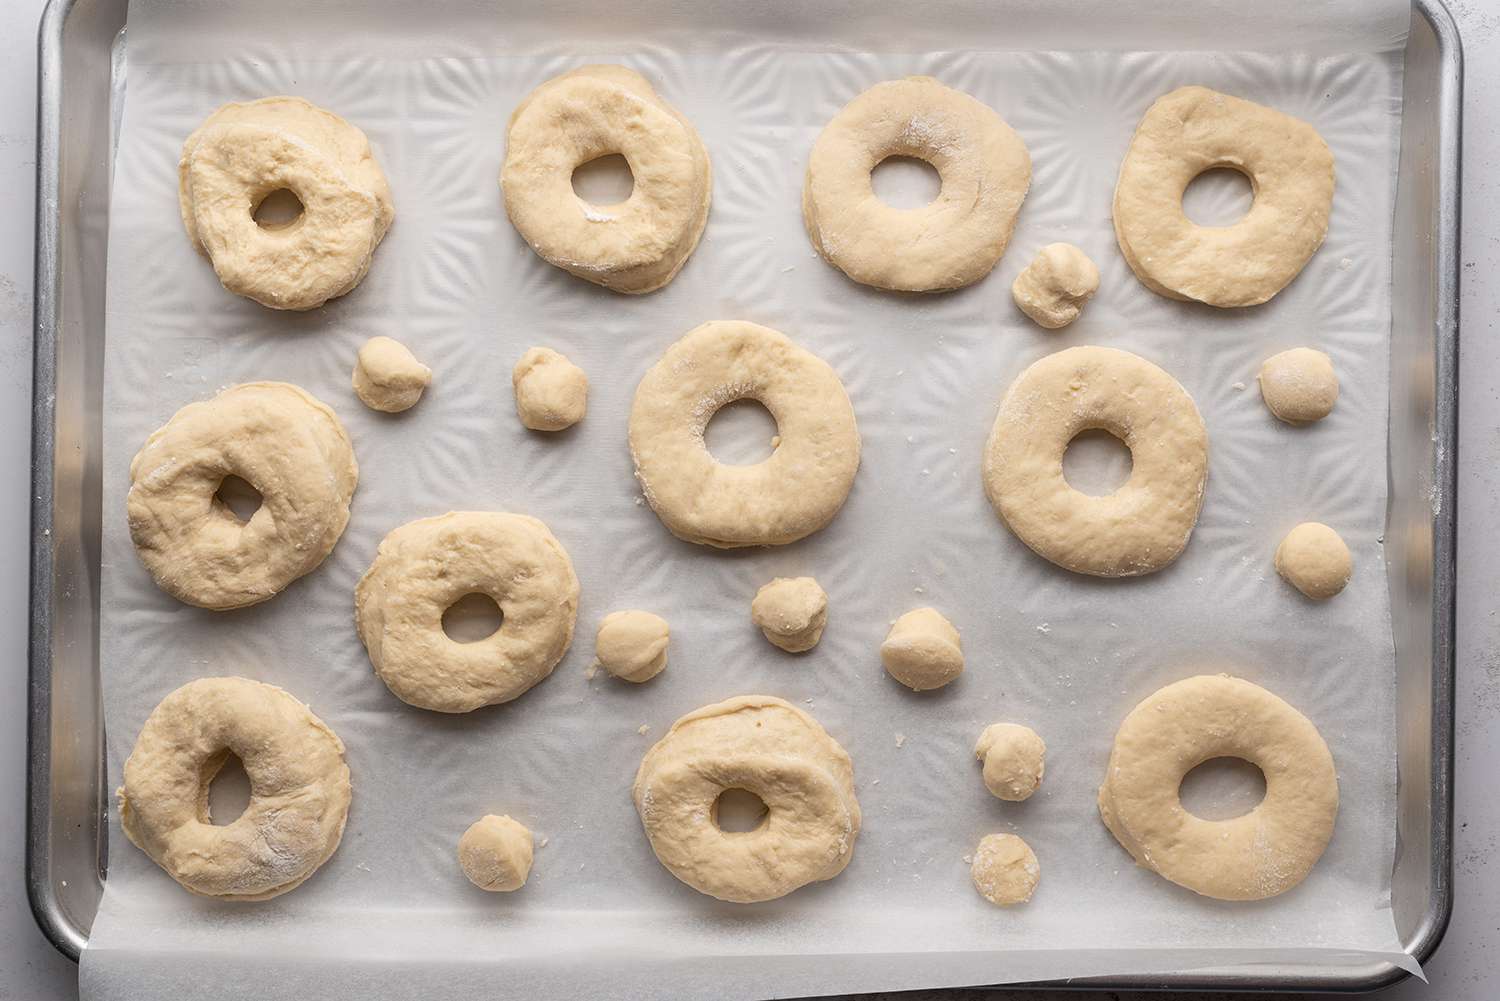
Cut out the doughnuts using round cookie cutters or a doughnut cutter and transfer to a parchment-lined baking sheet, leaving an inch of space between to allow for rising. Re-roll any remaining dough and repeat until you’ve cut all of the dough into donuts.
The Spruce Eats / Julia Hartbeck
-
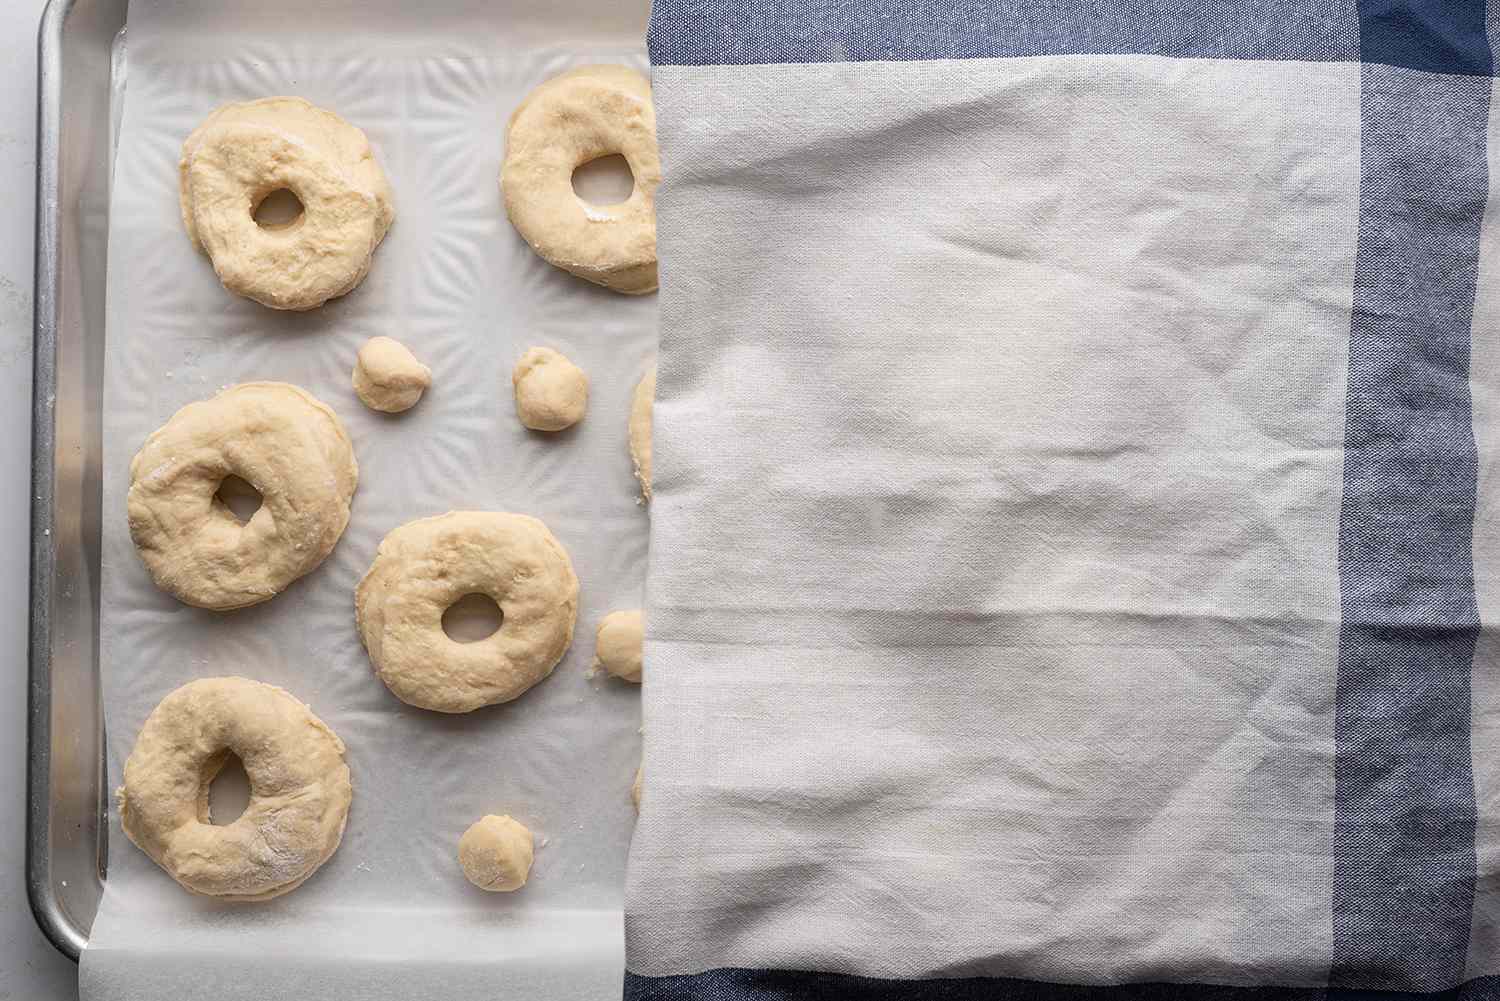
Cover with lightly damp kitchen towels and allow to rise until doubled in size and puffed and the dough springs back when touched, about 3 hours. At this point, you can continue to the next step or cover the doughnuts with plastic wrap and a kitchen towel and place in the fridge overnight.
The Spruce Eats / Julia Hartbeck
-
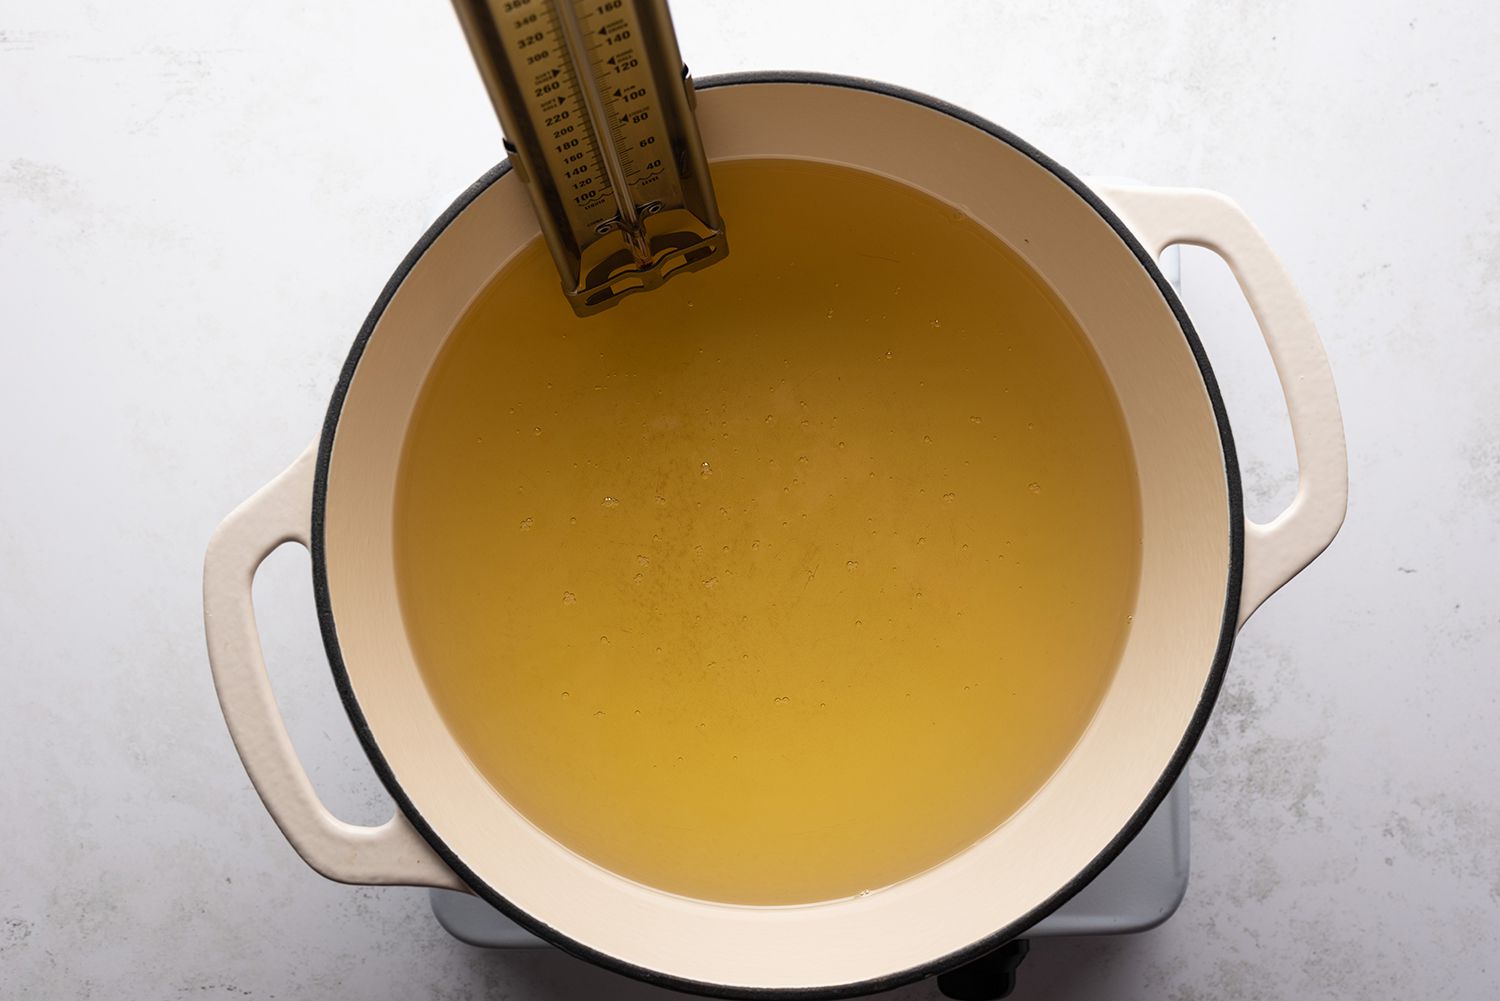
When the doughnuts are ready to be fried, heat about 2 inches of oil in a large cast-iron pan or Dutch oven until it reaches 360 F on a thermometer.
The Spruce Eats / Julia Hartbeck
-
Once the oil is hot, fry them in batches of 3 or 4 until golden brown, 1 to 2 minutes per side and about 30 seconds per side on the donut holes. Use a slotted spoon to transfer them to a baking sheet lined with paper towels.
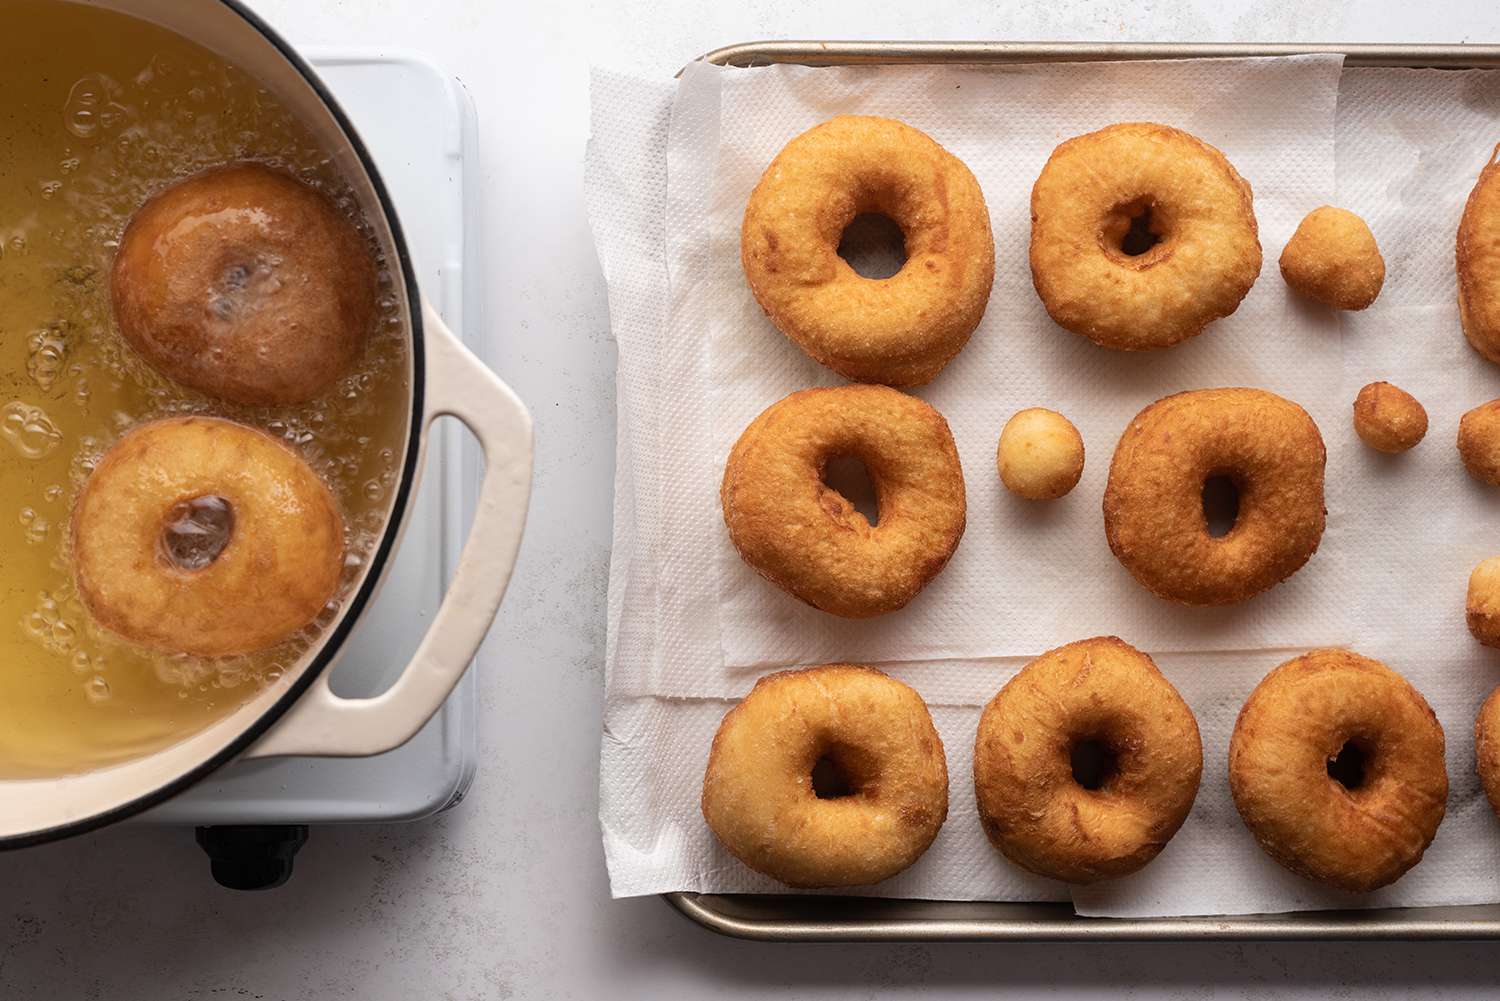
The Spruce Eats / Julia Hartbeck
-
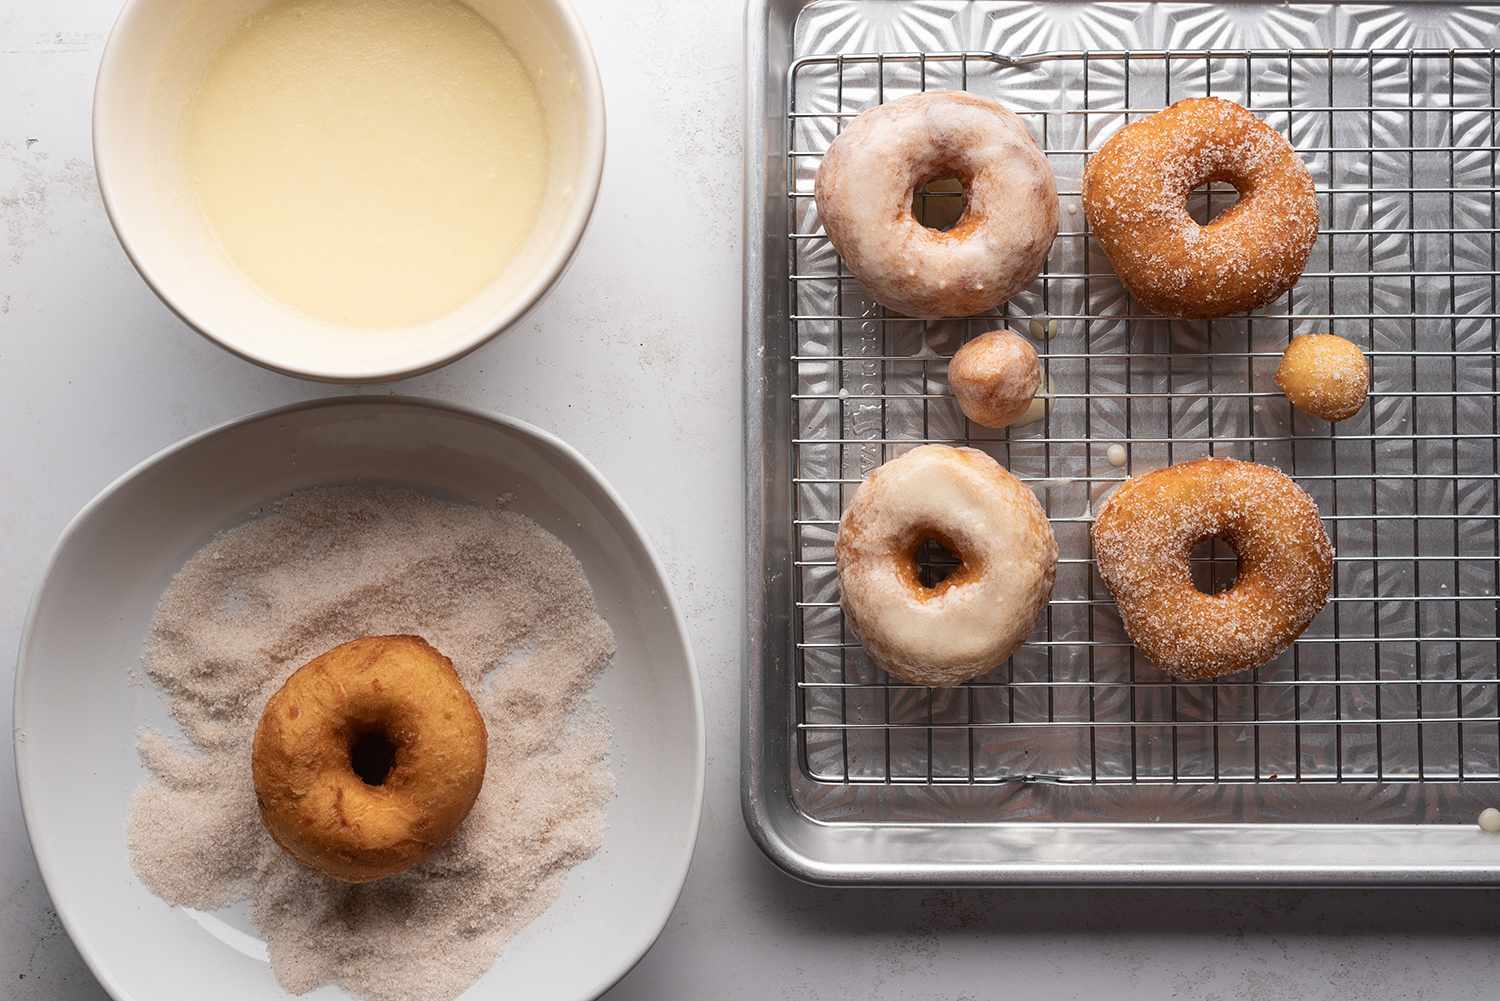
Let the donuts cool slightly, then dip both sides in a hot glaze or toss in cinnamon sugar and transfer to a serving dish. Serve immediately.
The Spruce Eats / Julia Hartbeck
Tips
- Sourdough donuts are best enjoyed fresh and warm. The sour flavor may increase over time, but they will last for 3 to 4 days when stored in an airtight container in the refrigerator.
- If the proofed, cut-out doughnuts are very soft and difficult to lift from the pan, you could: (1) put the pan in the freezer or fridge to firm them up a bit before frying or (2) cut the parchment underneath the doughnuts on the sheet pan so that each doughnut is sitting on its own small piece of parchment; submerge a doughnut into the oil with the parchment still underneath for support and remove the parchment from the oil with tongs.
- For cinnamon sugar, toss 1/2 cup of granulated sugar with 3 teaspoons of cinnamon in a paper or plastic bag. Add the warm doughnuts, a few at a time, and toss to coat.
Recipe Variations
- For vanilla flavor, add 2 teaspoons of pure vanilla extract along with the eggs.
- Add a dash of nutmeg to the dough.